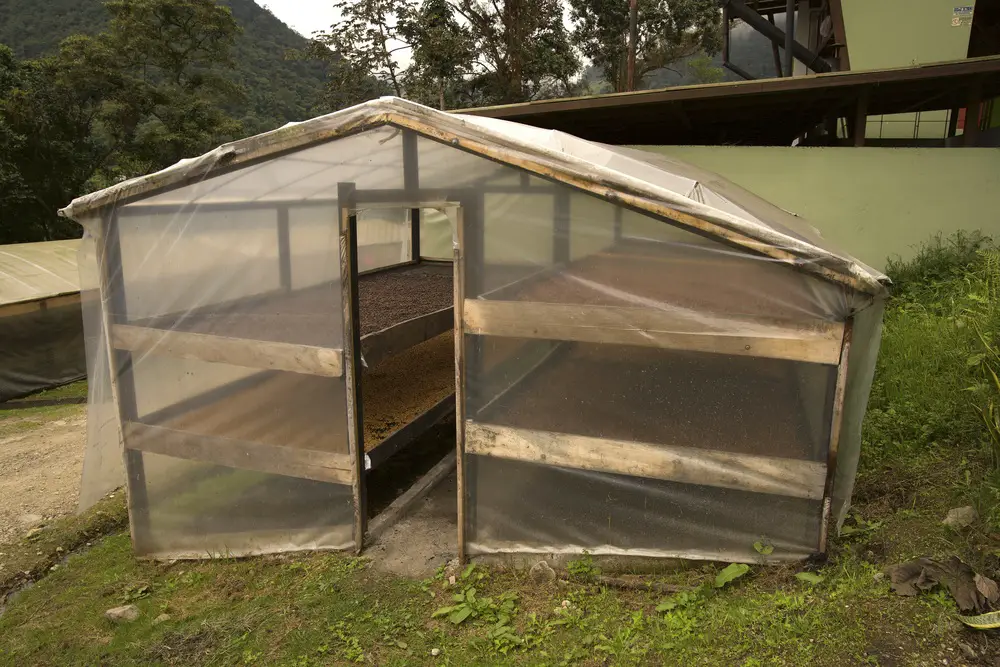
If you want to produce coffee, you cannot do without African beds.
They are also known as African dry beds. These keep the coffee cherries off the ground and allow for good air circulation. This contributes to better drying of the coffee cherries and ensures a more even coffee.
Table of Contents
The choice of location
To start construction, you need to decide where to place the African beds. This depends on the terrain and you should try to find a spot with the following characteristics:
- The location should be sunny most of the day.
- Good air circulation, a gentle slope would be best.
- Good accessibility, so the coffee can be constantly moved.
- No water stagnation or waterlogging.
- Away from places where there are strong odors. Example: away from toilets, drains, chicken coops, livestock and other sources.
Materials and tools
First of all, there are different methods for building raised beds. Then there are different materials that you can use, so you can judge for yourself which materials you can use.
Materials
- 2×4 inch lumber (support post)
- Wood 2×2 inch (frame)
- 1×4 inch lumber (side rails)
- Chicken wire
- Metal wire
- Screws or nails
- Staples
- Diesel
- Clear or dark plastic mesh
- Wood sealant
Tools
- 22-liter bucket or container
- Screwdriver
- Level
- Leveling chain
- Drilling machine
- Rubber mallet
- Scissors
- Wood saw
- Plans
When purchasing materials, you need to calculate the shape of each bed. Most materials or items such as chicken wire, chicken wire, plastic mesh, and tarps are available in specific sizes. It is important to take this into account when planning the size of the beds.
Preparation
Mark
The first thing to do is to mark the places where the sticks for the bottom of the African beds will be attached. For our first beds we placed a support post at a distance of 1.22 m and a total length of 12.20 m. Each bed is also 4 inches/1.22 meters wide.
More piles can be added in the middle to reinforce the structure.
Preparations for the posts
Once the holes for the posts are marked, dig out the spacing. Each of these holes should be at least 18 inches deep.
It is important to prepare the posts. They should be soaked or bathed in diesel or some other chemical for 24 hours to prevent them from rotting and serving as food for pests. To do this, use the substance or chemical in containers or buckets and soak the posts.
After the 24-hour exposure time, they should be painted with the wood sealer you have already purchased so that they can withstand the weather better.
Construction
Now that the basics are in place, we can start building the beds.
Attaching the pedestals
The posts or bases are nailed or hammered into place and leveled with a leveling chain and spirit level. The leveling chain should be attached to the first and last posts with good tension. Then the first two posts should be adjusted so that they are slightly above hip height.
Then the other posts are adjusted according to the leveling chain.
It’s important to note that if you place your African bed on a slope, the measurements of the posts and their holes will change in length, so you will likely need to change the measurement of the depth of the holes.
Construction of the frame
With the posts installed and leveled correctly, it is time to assemble the frame that will be supported by the posts. You’ll start by cutting out the 2×2 inch pieces of wood. After being cut to the correct dimensions, they can be assembled to form the frame of the drying bed.
Metal wire and mesh
Now it’s time to attach the chicken wire, which will serve as extra support for the weight of the bed.
The wire netting should be placed evenly, approximately every 30 cm (1 foot), and counted to the appropriate length. The staples should be hammered in to ensure they are secure at each end.
After the metal wire is laid, the mesh can be laid, unrolled and laid on top. Again, it’s necessary to work with clamps to make sure it’s taut from end to end.
Finally, cut off the rest of the mesh on the sides to make it look cleaner.
Side rails
These rails ensure that the coffee does not tip over during the drying process.
You will use 1×4 inch lumber for this, which will need to be hammered or screwed along the frame.
Net and tarpaulins
Finally, the plastic mesh to be used is cut to size. This should be made to fit and placed over the African beds to ensure it fits properly.
When the net is not in use, it is best to fold it up and store it.
Sunshade grilles according to FNCC
In Colombia, there is the National Association of Coffee Growers of Colombia. There is an article or guide there about low-cost solar dryers for drying coffee i.e. low-cost African beds.
This guide describes the beds and the materials needed to make them, with different coffee cherry weight capacities ranging from 90 kg to 540 kg.
These beds are usually made using artisanal methods. The main material used in its manufacture is guadua, a plant of the bamboo family. This material was and is used in the construction of houses, household appliances, tools for hunting, livestock and agriculture, and even aqueducts.
90 kg cherry coffee solar system
These solar parcels consist of shells, bases and a plastic cover. For the construction of a 90 kg cherry coffee container, the following materials are required:
For standard grating
- 2 x 38″ x 3″ wattle boards with 3/8″ center holes. Three boards are obtained by starting lengthways from a common board; their width is then between about 7 and 8 cm.)
- 2 x 150 x 8 cm wall covering
- 2 sticks of 154 x 4 cm
- 4 sticks of 96 x 4 cm
- 1 x 100 x 150 cm red 5000 mesh or Secafez 4 x 4-inch black polyethylene mesh
- 2 greenhouse plastics 37 x 96 cm plastic foil, these to line the wooden frame
- 2 x greenhouse plastics 37 x 150 cm, for lining the wooden frame
- 2 x greenhouse plastics 6, 25 x 96 cm, for lining the wooden frame
- 1 box of insulating clips #5 x 50 to fix the net
- 2 lengths of 1/2″ x 150cm black polyethylene tubing with 6 perforations on one side only, 5/16″ for attachment to side frame with 1½” cords
- 43 2-inch cords (1 lb = 200 cords)
- 12 1½ inch cords for attaching the polyethylene tubing to the frame
- 12 ¾ inch cords to hold and secure the plastic to the wood frame during assembly.
For the clear plastic cover
- 2 x 378-inch x 50 cm aluminum tubes. Cover bracket.
- 1 piece 1-inch black polyethylene tubing x 250 cm, frame.
- 1 bar 2 x 2 cm cross section and length x 250 cm. Internal reinforcement on the frame
- 1 piece of ¾ inch x 100cm black polyethylene tubing for making 7cm compression-lock cannulas
- 1 piece of transparent plastic greenhouse 250 x 200 cm that serves as a cover to create the greenhouse effect.
For the construction of the shell a plank frame is assembled in the form of a wickerwork, to which is attached the plastic mesh, secured with insulating clips to generate and maintain heat, and a rod frame is used to fasten the mesh to the first. Any type of wood can be chosen.
Unless otherwise noted, the thickness of some parts, e.g. B. the formwork boards and the bars, 25 millimeters.
Conclusion
Time and capital are investments that can be costly, but the investment is worth it. It is even better if you look for different methods of production.
The coffee beds will help us keep the coffee clean while drying it evenly, which contributes to our coffee production.
I hope you can use this guide and build your own African coffee drying bed.